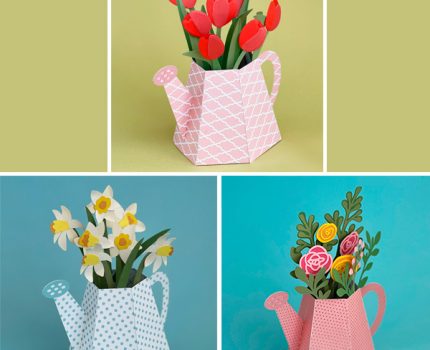
Watering Can Box Card
Today, Iām super excited to finally share something that has been keeping me awake, glued to my sketch pad, and honestly⦠kind of giddy. Iāve just released three brand new box card designs! šø Super sweet watering can box cards, and I have to sayāit might just be one of my all-time favorites. (I know I say that a lot)
I know many of you love making handmade cards that feel extra special, and these box cards totally check that box (pun intended!). They’re 3D, beautiful, and yet they fold flat for mailing. So practical and still so wow-worthy.
Let me walk you through whatās new, how these cards work, where the idea came from, and of course⦠all the times I failed trying to make them before that āaha!ā moment finally hit. Because thatās how it goes, right?
š” From Idea to āIt Folds Flat!ā
Okay, so Iāve been obsessed with 3D paper cards for years. But I wanted to create something fresh, something that felt fun to build and had a wow factor when openedāyet still fits inside a regular envelope. These box cards do just that!
The watering can box card was the one that gave me the biggest challenge⦠but also the most joy. I knew I wanted to make a box card shaped like a little watering can filled with spring flowers. The idea felt whimsical and gift-worthyālike handing someone a mini garden.
But ohhh my gosh⦠the number of times I messed up before it worked. š
I tried so many shapes, flaps, slotsāsome just collapsed, some looked awkward, and some wouldnāt fold flat no matter how I twisted them. My desk was a battlefield of failed prototypes.
But honestly? I love that part of the process.
That moment when I finally get a shape to hold up, fold flat, and pop back into place again⦠it makes my heart so happy. I love the struggle, because every try and fail gets me closer to something that feels just right.
I like to use the ball tool to add some dimension to the edges. This tip doesn’t significantly increase the assembly time of the card. Just run the tool round the edge not pressing too hard (watch the video below).
There are five basic steps to assemble all three box cards – the inner layers, card base and the side panels are the same.
I use quite thick cardstock for the green inner layers (1,2 and 3) of the card because they must support the weight of the flowers.
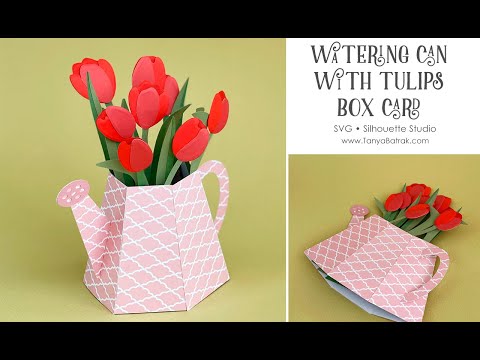
š¬ Easy to Mail (Just One Thing to Note)
Each card folds flat for mailingāyep, totally postable! But because of how the structure is built, they only fold one way (to the left). I designed them with standard tools in mind, so theyāre fully compatible with Silhouette Cameo and Portrait machines.
Youāll just need an envelope thatās at least 16.5 x 20.5 cm. I recommend adding a bit of padding or a āplease do not bendā sticker if youāre mailing it out. But otherwise, itās super easy to slip one into an envelope and send a smile across the miles.
The cut files are available:
Watering Can Box Card with Tulips
- Silhouette Studio cutting file
- SVG cutting file (coming soon)
Watering Can Box Card with Daffodils
- Silhouette Studio cutting file
- SVG cutting file (coming soon)
Watering Can Box Card with Flowers
- Silhouette Studio cutting file
- SVG cutting file (coming soon)
Watering can box card with tulips – video assembly tutorial
The base of all three cards are assembled in the same way.
When to Use the watering can Box Card?
Honestly, these cards work for so many moments. But here are some ideas:
- Birthdays
- Motherās Day
- Thinking of you
- Get well soon
- Teacher appreciation
- Baby showers
- Spring greetings
- Valentine’s Day
- Wedding congratulations
- Just because
A handmade box card says you matterāand these little 3D beauties do that loud and clear.
Why I Love This Creative Struggle
Okay, letās get real for a second. Designing box cards is not a one-and-done kind of thing. Itās a brain workout. And I love that.
As paper engineer I like to strain my brain (weird, right?) trying to invent something brand new. Iāll try 10 times, fail, cut it again, tweak it again⦠and fail again. Itās frustrating, but in a fun way. š
But thenāone morning, after maybe a dozen paper mishaps, something clicks. The box stands just right. The fold actually folds. The pieces come together. And then I just sit there smiling like a goof because it finally worked.
Thatās the moment I live for.Ā This little struggle? Itās what makes handmade so magical. And Iām so happy I get to share these designs with youābecause I know youāll bring your own love and creativity to each one.
Don’t forget to check my other box cards here on my blog!
And this is how to assemble the daffodils


Happy crafting!